

Image resizing is a very common geometrical transformation of an image, and it simply consists of a scaling operation.
Since it is one of the most common image processing operations, you can find its implementation in all image processing libraries. Because it is so common, you can expect that the behavior is well defined and will be the same among the libraries.
Unfortunately, this is not true because some little implementation details differ from library to library. If you are not aware of it, this could create a lot of trouble for your applications.
A tricky scenario that could happen, and we as the ML team experienced it, could come from the pre-processing step of a machine learning model.
Usually, we resize the input of a machine learning model mainly because models train faster on smaller images. An input image that is twice the size requires our network to learn from four times as many pixels, with more memory need and times that add up.
Moreover, many deep learning model architectures require that the input have the same size, and raw collected images might have different sizes.
The workflow of the development of an ML model starts from a training phase, typically in Python. Then, if your metrics on the test set satisfy your requirements, you may want to deploy your algorithm.
Suppose you need to use your model in a production environment written in C++, e.g., you need to integrate your model in an existing C++ application. In that case, you want to use your solution in another programming language 1, and you need a way to export "something" that could be used in the production environment.
A good idea to preserve the algorithm behavior is to export the whole pipeline, thus not only the forward pass of the network, given by the weights and the architecture of the layers but also the pre-and post-processing steps.
Fortunately, the main deep learning frameworks, i.e., Tensorflow and PyTorch, give you the possibility to export the whole execution graph into a "program," called SavedModel or TorchScript, respectively. We used the term program because these formats include both the architecture, trained parameters, and computation.
If you are developing a new model from scratch, you can design your application to export the entire pipeline, but this is not always possible if you are using a third-party library. So, for example, you can export only the inference but not the pre-processing. Here come the resizing problems because you probably need to use a different library to resize your input, maybe because you don't know how the rescaling is done, or there isn't the implementation of the Python library in your deploying language.
But why the behavior of resizing is different?
The definition of scaling function is mathematical and should never be a function of the library being used. Unfortunately, implementations differ across commonly-used libraries and mainly come from how it is done the interpolation.
Image transformations are typically done in reverse order (from destination to source) to avoid sampling artifacts. In practice, for each pixel of the destination image, you need to compute the coordinates of the corresponding pixel in the input image and copy the pixel value:
where is the inverse mapping.
This allows avoiding to have output pixels not assigned to a value.
Usually, when you compute source coordinates, you get floating-point numbers, so you need to decide how to choose which source pixel to copy into the destination.
The naive approach is to round the coordinates to the nearest integers (nearest-neighbor interpolation). However, better results can be achieved by using more sophisticated interpolation methods, where a polynomial function is fit into some neighborhood of the computed pixel , and then the value of the polynomial at is taken as the interpolated pixel value 2.
The problem is that different library could have some little differences in how they implement the interpolation filters but above all, if they introduce the anti-aliasing filter. In fact, if we interpret the image scaling as a form of image resampling from the view of the Nyquist sampling theorem, downsampling to a smaller image from a higher-resolution original can only be carried out after applying a suitable 2D anti-aliasing filter to prevent aliasing artifacts.
OpenCV that could be considered the standard de-facto in image processing does not use an anti-aliasing filter. On the contrary, Pillow, probably the most known and used image processing library in Python, introduces the anti-aliasing filter.
Comparison of libraries
To have an idea of how the different implementations affect the resized output image, we compared four libraries, the ones we considered the most used, in particular in the ML field. Moreover, we focused on libraries that could be used in Python.
We tested the following libraries and methods:
-
OpenCV v4.5.3:
cv2.resize -
Pillow Image Library (PIL) v8.2.0:
Image.resize -
TensorFlow v2.5.0:
tf.image.resizeThis method has a flag
anti-aliasto enable the anti-aliasing filter (default is false). We tested the method in both cases, either flag disabled and enabled. -
PyTorch v1.9.0:
torch.nn.functional.interpolatePyTorch has another method for resizing, that is
torchvision.transforms.Resize. We decided not to use it for the tests because it is a wrapper around the PIL library, so that the results will be the same compared toPillow.
Each method supports a set of filters. Therefore, we chose a common subset present in almost all libraries and tested the functions with them. In particular, we chose:
- nearest: the most naive approach that often leads to aliasing. The high-frequency information in the original image becomes misrepresented in the downsampled image.
- bilinear: a linear filter that works by interpolating pixel values, introducing a continuous transition into the output even where the original image has discrete transitions. It is an extension of linear interpolation to a rectangular grid.
- bicubic: similar to bilinear filter but in contrast to it, which only takes 4 pixels (2×2) into account, bicubic interpolation considers 16 pixels (4×4). Images resampled with bicubic interpolation should be smoother and have fewer interpolation artifacts.
- lanczos: calculate the output pixel value using a high-quality Lanczos filter (a truncated sinc) on all pixels that may contribute to the output value. Typically it is used on an 8x8 neighborhood.
- box (aka area): is the simplest linear filter; while better than naive subsampling above, it is typically not used. Each pixel of the source image contributes to one pixel of the destination image with identical weights.
Qualitative results
To better see the different results obtained with the presented functions, we follow the test made in 3. We create a synthetic 128 x 128 image with a circle of thickness 1 px, and we resized it with a downscaling factor of 4 (destination image will be 32 x 32).
We decided to focus on downsampling because it involves throwing away information and is more error-prone.
Here you can see the qualitative results of our investigation:
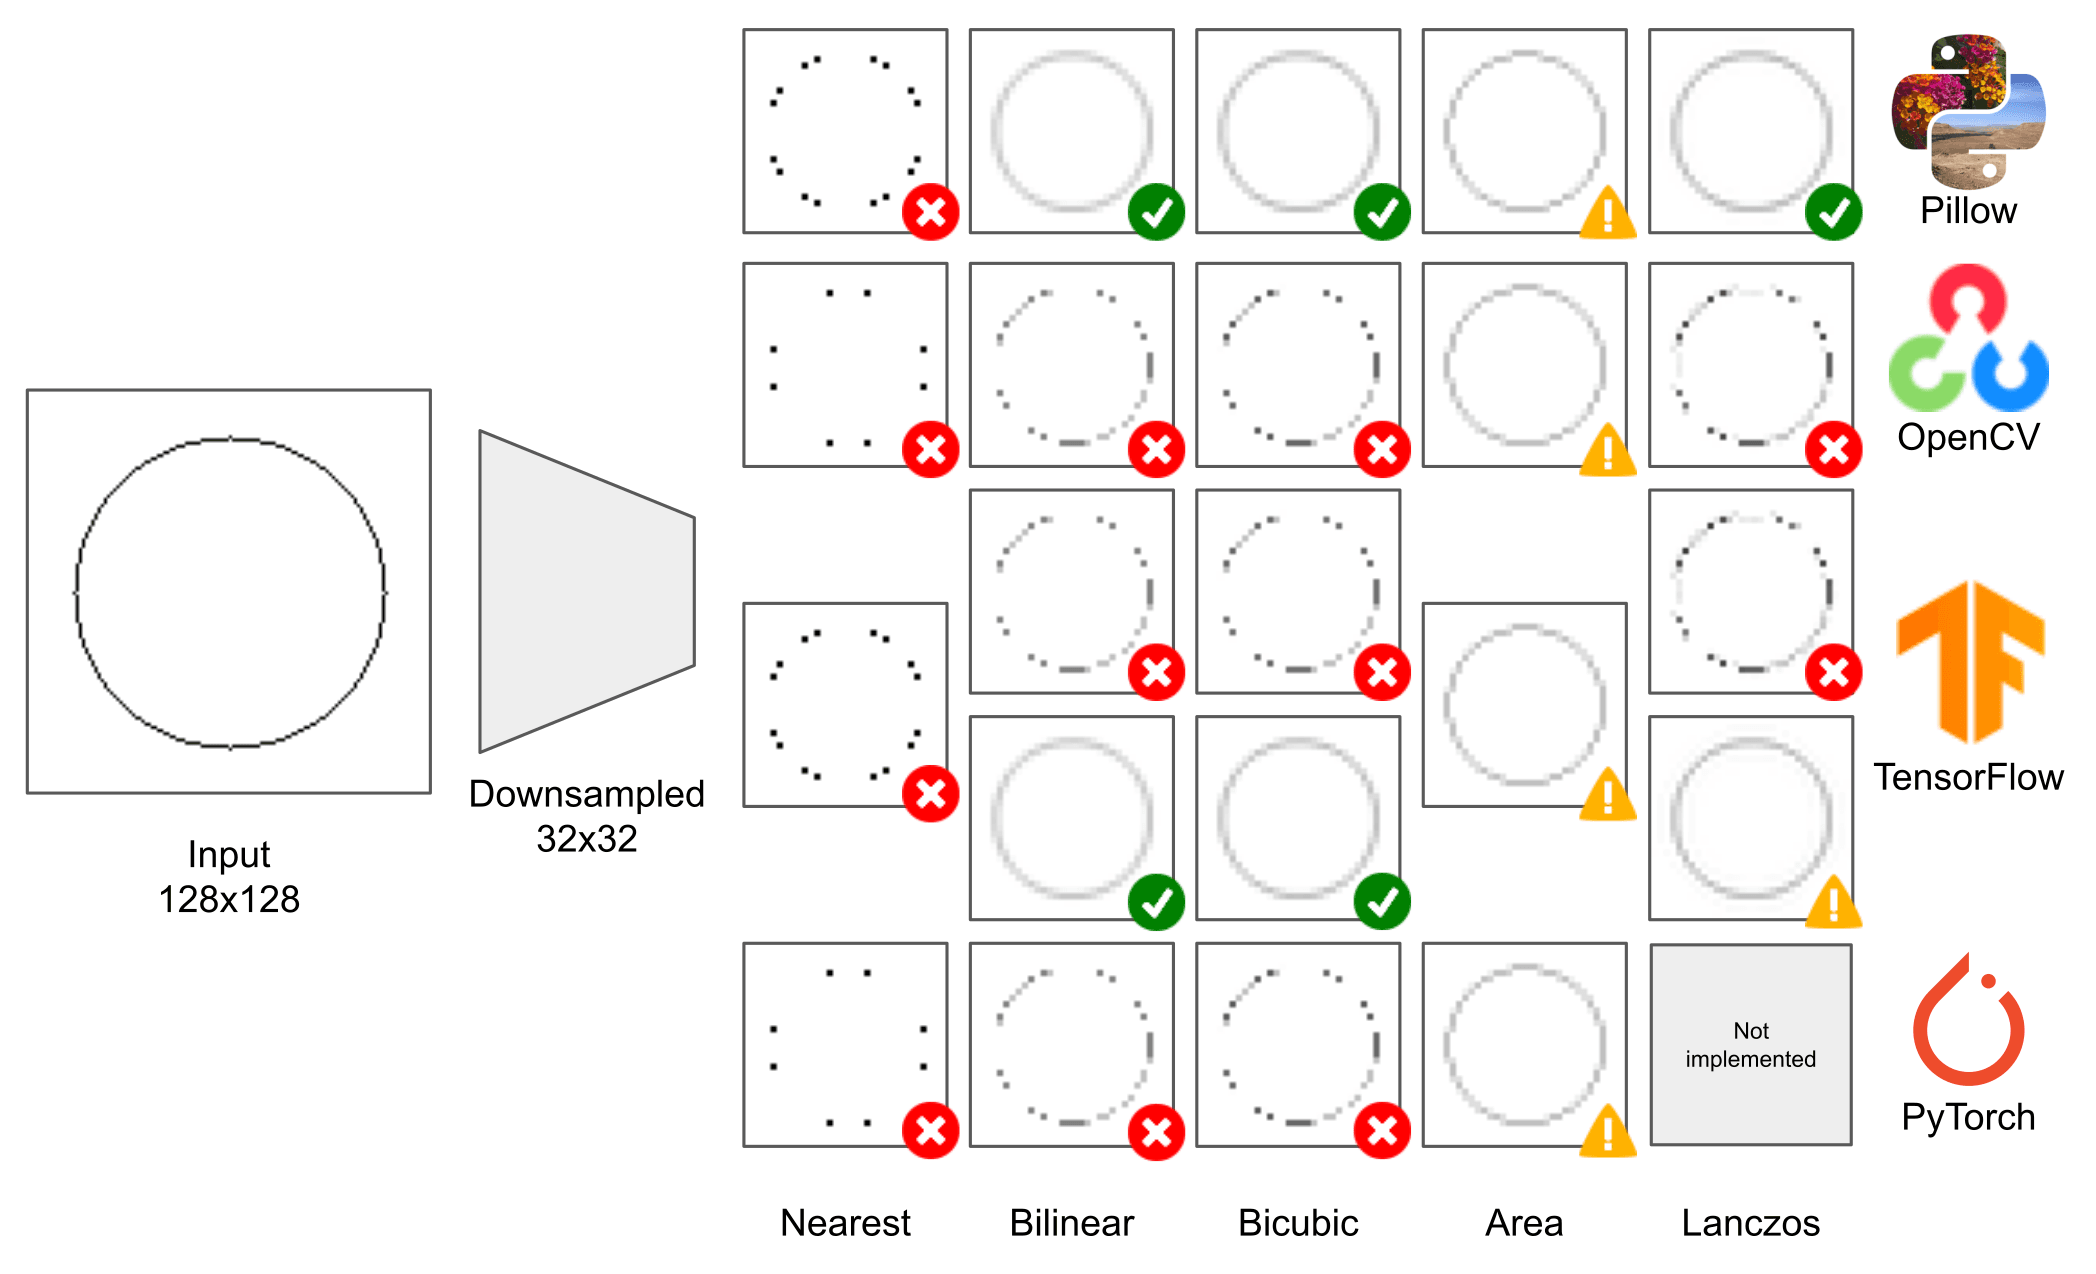
In Figure 1, we added an icon to highlight if the downsampling method antialiases and remove high-frequencies in the correct way. We used a green icon to show good results, yellow if the filter does not provide sufficient antialiasing, red if artifacts are introduced in the low-resolution image.
As you can see, even downsampling a simple image of a circle provides wildly inconsistent results across different libraries.
It seems that Pillow is the only one that performs downsampling in the right way in fact, apart from the nearest filter that for definition does not apply antialiasing, all the others do not introduce artifacts and produce a connected ring.
OpenCV and PyTorch achieve very similar results for all the filters, and both do not use antialiasing filters.
This sparse input image shows that these implementations do not properly blur, resulting in a disconnected set of dots after downsampling gave a poor representation of the input image.
TensorFlow has a hybrid behavior. If you don't enable the antialiasing flag (first row), the results are the same as OpenCV. Instead, if you enable it, you get the same results as Pillow.
I find it interesting that there are differences even for a filter like the nearest neighbor that is quite straightforward to implement. At the same time, the box filter seems to give the same results among the libraries.
Eventually, we can consider the methods as two categories: Pillow-like results and the ones similar to OpenCV.
We further evaluate the libraries with other synthetic images with different patterns. The first one (Figure 2) is a grid of white square 50x50 with 5 pixels of black border.
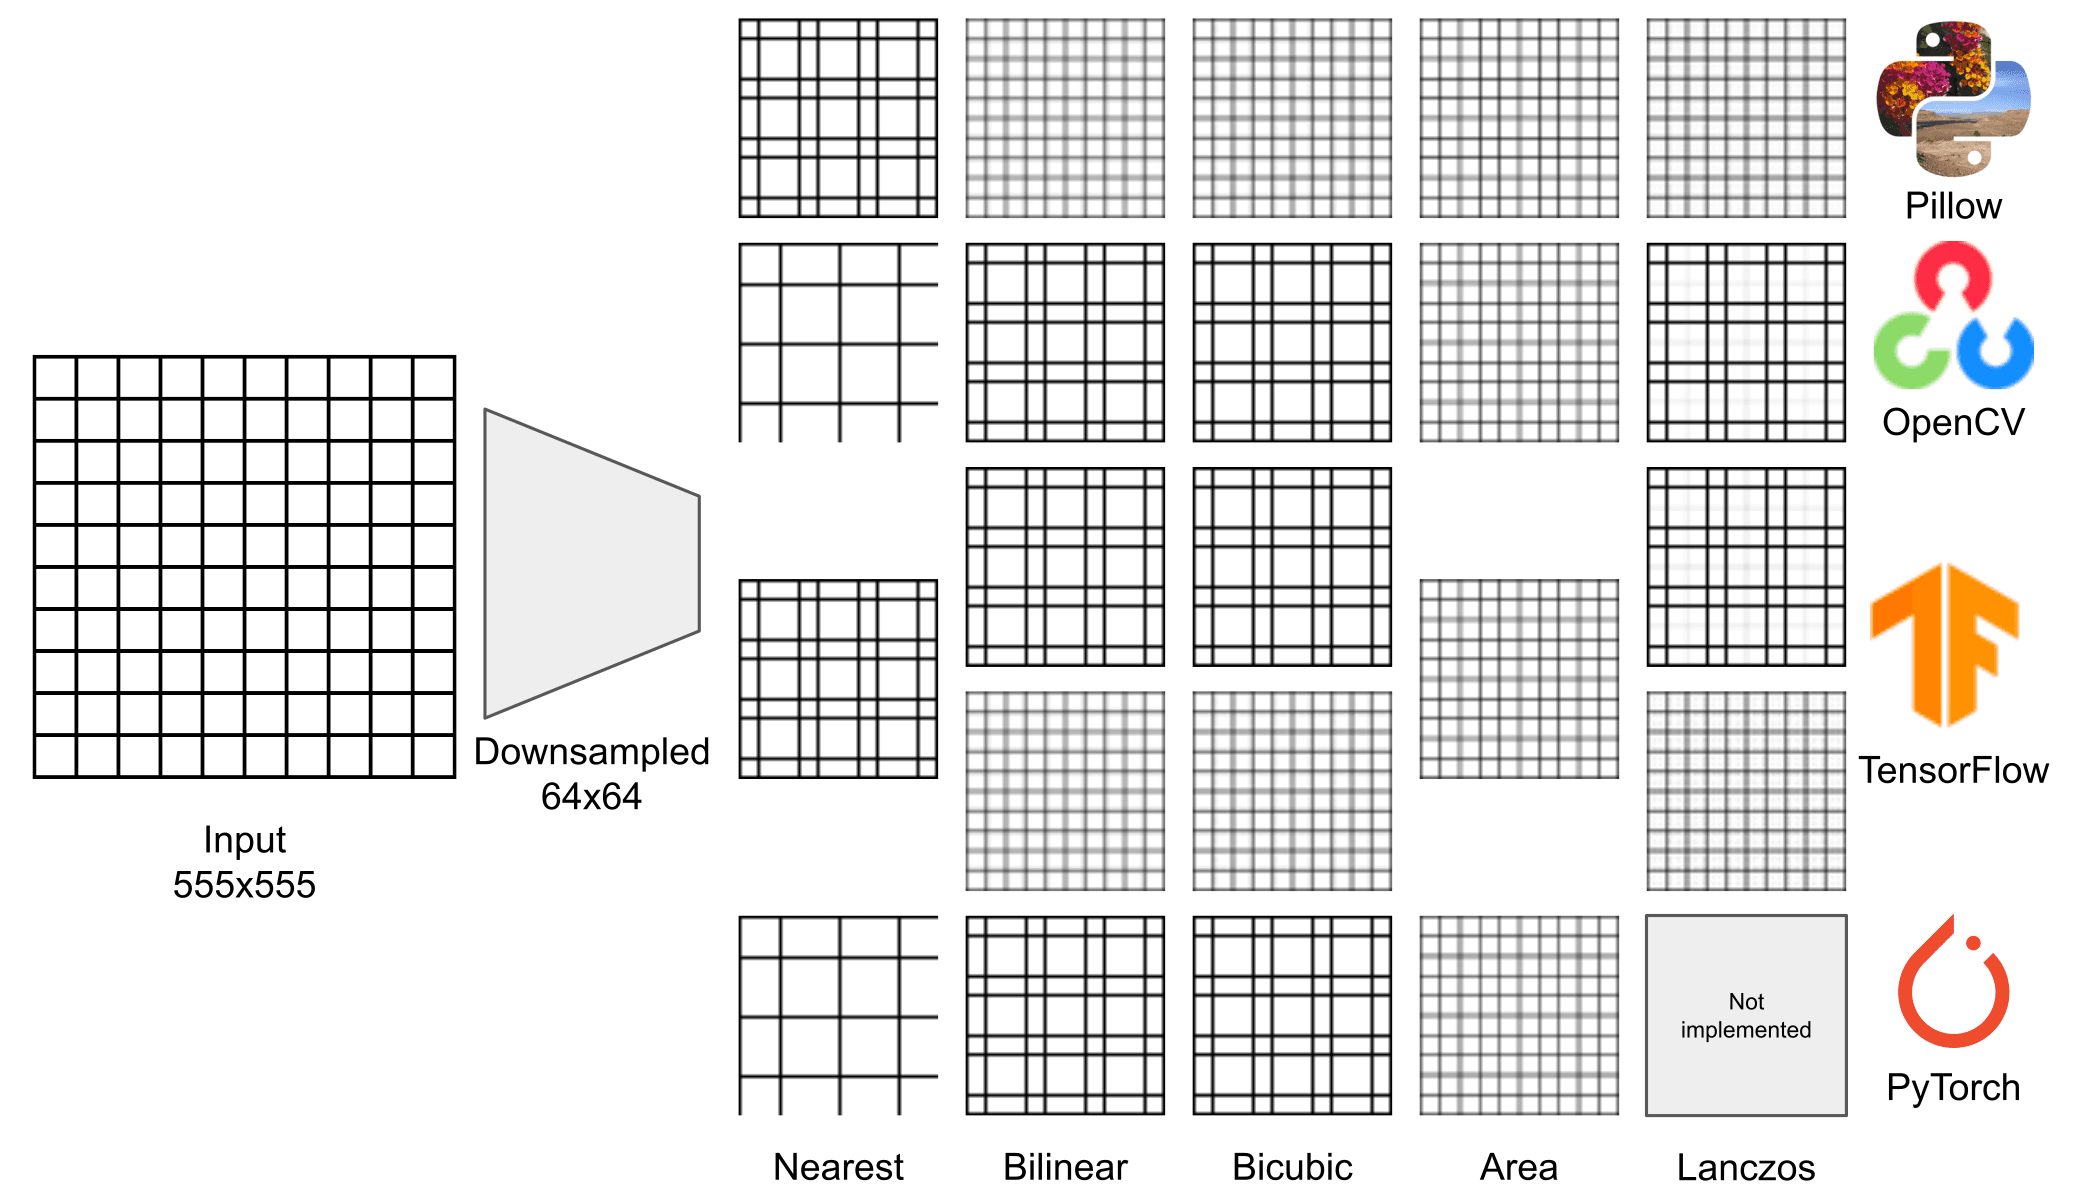
The previous considerations are valid also in this case, and it is clear how without the antialiasing the resulting images do not represent correctly the input.
If you look at OpenCV results, it is curious that they are, in practice, the same results given by the nearest neighbor filter of Pillow. It seems like that incorrectly implemented filters inadvertently resemble the naive approach.
Other interesting results can be achieved using a pattern similar to the previous grid but with a border enlarged to 22 pixels and 20x20 white squares (note that we use a slightly different value for the border and the squares).

All the low-resolution images are 64x64 and are displayed with the same size as the raw image only for a better view.
With this input the number of squares in the resulting images is unchanged, but in some cases, some rows or columns have a rectangular shape.
Natural images
We chose to use synthetic images because we want to evidence the creation of artifacts and see the differences between libraries. These differences are more difficult to see on natural images, i.e., the ones acquired with a camera. In this case, as you see in the figures below, the results with the nearest neighbor filter are quite the same while, using the bilinear one, the effect of the antialiasing filter becomes more visible.

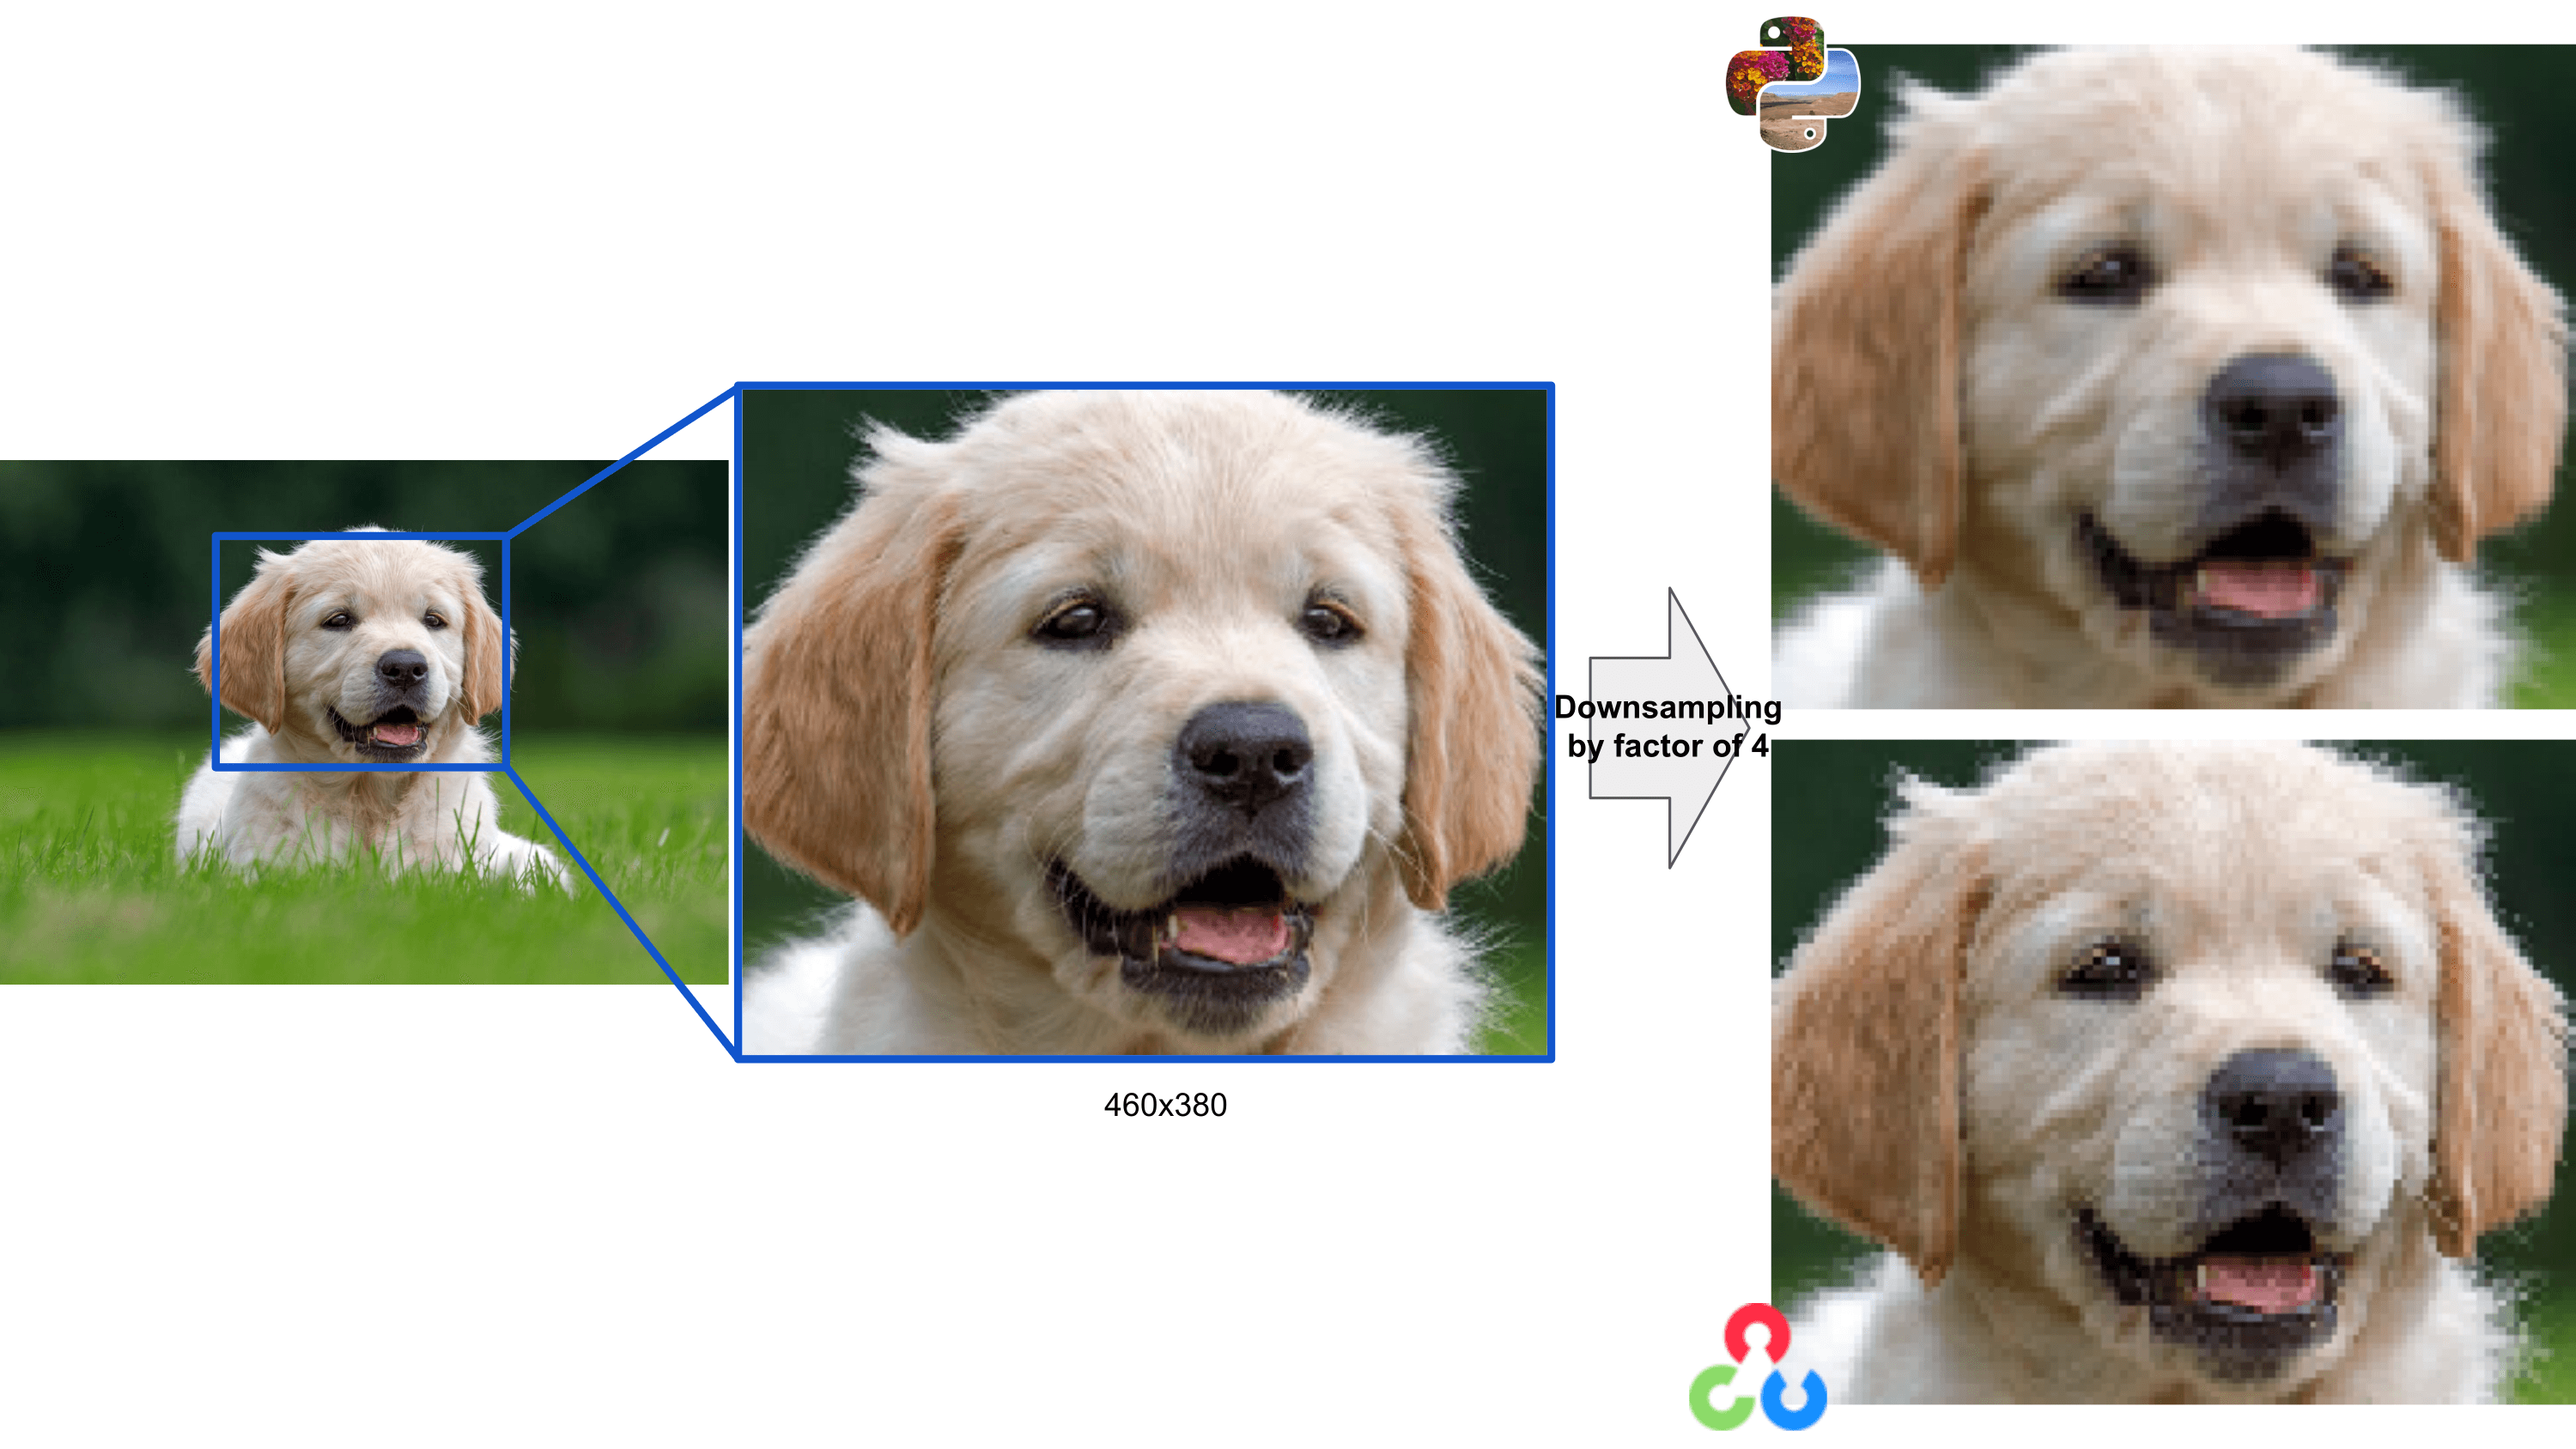
Image resizing in ML models
As mentioned in the first part of the article, image resizing could be a problem even in a machine learning application.
Imagine you want to use a model from an ML third-party library. For example, you want to solve a problem of instance segmentation from images. You find an incredible library from Facebook Research, called Detectron2, which contains the state-of-the-art for this class of problems. The authors provide all kinds of functionality, including scripts from training and evaluation on your dataset and even the script for exporting your new trained model. It could be challenging and time-consuming to reproduce the same features from scratch, so you can use the library in your application.
Suppose you train the network on your data. Then you want to put the model into production. Your deployment environment is written in C++, so you export the model as TorchScript, and you use the PyTorch C++ library to load the module and run the experiments. You know that Detectron needs images with a fixed size as input, then you use OpenCV to rescale your input. If you feed the network with the same images, you will expect the same results, but unfortunately, this is not true. You check everything, and it seems correct. If you dig inside the code, you will eventually find Detectron uses Pillow to resize the input image, and, as you could see in the section before, the results could be very different.
Conclusion
This article demonstrated that even if image resizing is one of the most used image processing operations, it could hide some traps. It is essential to carefully choose the library you want to use to perform resize operations, particularly if you're going to deploy your ML solution.
Since we noticed that the most correct behavior is given by the Pillow resize and we are interested in deploying our applications in C++, it could be useful to use it in C++.
The Pillow image processing algorithms are almost all written in C, but they cannot be directly used because they are designed to be part of the Python wrapper.
We, therefore, released a porting of the resize method in a new standalone library that works on cv::Mat so it would be compatible with all OpenCV algorithms.
You can find the library here: pillow-resize.
We want to remark again that the right way to use the resize operation in an ML application is to export the algorithm's pre-processing step. In this way, you are sure that your Python model works similarly to your deployed model.
I want to acknowledge Guido Salto for helping in the choice of the patterns that better highlight the artifacts and the differences in the results.