


With this document, I would like to present a method to work with Git that it is really effective. It is easy to apply and brings a lot of advantages to every software or production oriented environment. The workflow is based on the feature branch workflow as described here, with some changes. The method is certainly open to any type of customization according to the preferences of the working group. Anyway, you can consider the actualization that I'm presenting you here as the state-of-the-art of the method. It is indeed already adopted by big companies (for example, I learned about this methodology during a course held by a Microsoft evangelist) and by almost every big software house that design big and well-organized applications.
It is commonly known with the name of Release Flow.
Release Flow - The Method
To quickly understand the method, here two useful pictures:
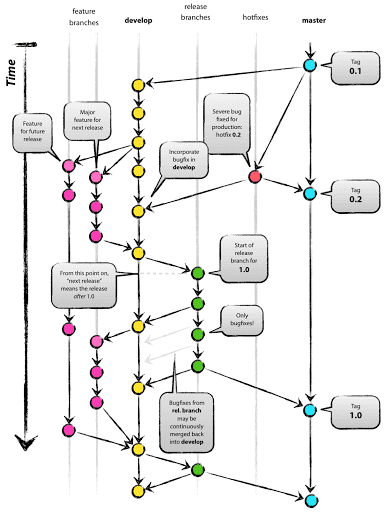
What is the difference between the two pictures? The difference is that in Figure 2, as you can see, there is an extra branch called develop. Apart from this difference, which will be explained shortly, the two images describe in a concise way what it means to work with the Release Flow method. Whether or not you use the develop branch makes no substantial difference and its use is at the discretion of the development team.
I will describe the two approaches in the following chapters.
Release Flow - Version 1
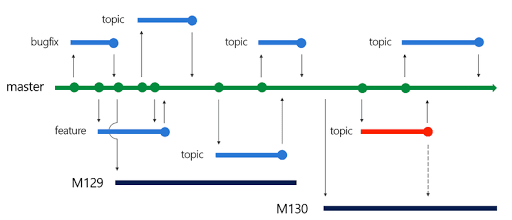
Taking Figure 3 as a reference, I will now describe as briefly and clearly as possible the workflow. If you will find the explanation a little bit tangled, please do not worry, it is harder said than done.
What we can see in the image are:
- a green line, that represents the master branch;
- light blue lines, that represent tasks branches (bugfix, feature, and topic that it is a task);
- a red line, that represents an important fix branch;
- dark blue lines (M129, M130), that are the branches of two different software release.
What happens is the following. There is always a master branch. This branch must be always in a stable state. This means that in any moment of your life you should be able to pick the current master HEAD and deploy it in production without worries because the software would work (hidden not yet discovered bugs excluded).
If no release has been planned, the work should continue on the master branch. Remember, however, that this branch cannot be directly modified. This is the philosophy behind the feature branch approach that is the minimum requirement that one should fulfill to correctly employ a proper git workflow and is visually described in Figure 3 through the use of the blue lines. As an example, let's say that a new task foo should be developed. What happens is that the developer should create the foo branch (from the master) and complete the task on that very branch. Once the task is completed, the developer should pull any new changes from the master branch into his local foo branch in order to locally solve any conflicts. Finally, he should do a pull/merge request that will be reviewed and then applied to the master branch. It is important to note that during the development of the task should involve only changes for that very task, so any desire to fix other things while working inside the foo branch should be dismissed and a new task to work on later should be opened.
If, most commonly, the release of a 2.0.0 version has been planned (e.g.: M129 as in Figure 3), a new release branch should be created starting from the master. Everyone that is intended to work on the 2.0.0 release should work directly, always using the feature branch approach, on this branch. Please note that creating a 2.0.0 release branch does not mean that that version has been released to the public. Here lie some important aspects of this Release Flow workflow:
- Once the 2.0.0 (or M129 in the image) release branch has been created no other feature should be added for development for that release. Hence, any other feature will be put on the backlog of future releases.
- Nothing else will be added from the master branch into the 2.0.0. If you are asking: and what if we find a bug in the master branch? Well, remember that the master branch should be the stable branch without any problem! But if this happens, and surely would happen, you should be able to cherry-pick from the master branch that particular commit and fix the 2.0.0.

- Once the 2.0.0 will be officially released to the public, the 2.0.0 branch will be merged into master and that point will be tagged. From now on, the 2.0.0 branch should be left untouched! Only important bug fixes should be applied to 2.0.0 and if that bug exists even on the master branch, that should be also cherry-picked into the master branch . When a new bug is fixed in the 2.0.0 release, the 2.0.1 version is released to the public.
As soon as a new version is planned to be released, it should be named as 2.1.0 or 3.0.0 and a new branch (for example the M130 in Figure 3) will be created, and so on. The versioning is chosen at a previous design phase but it is advised to follow the Semantic Versioning approach that describes a version with a MAJOR.MINOR.PATCH number:
- MAJOR version when you make incompatible API changes,
- MINOR version when you add functionality in a backwards-compatible manner, and
- PATCH version when you make backwards-compatible bug fixes.
Release Flow - Version 2
Figure 5 below represents the second version of the Release Flow workflow and adds to the one presented in Figure 3 the develop branch.
The develop branch should replicate the master and exists to keep always the master branch untouched. What I said in the previous chapter (Release Flow - Version 1) it is still true here but instead of applying it to the master branch it is referred to the new develop branch. What happens here are the following:
- Every time a release is planned and when the source code in the develop branch is stable, a new release branch is created, this time starting from the develop branch.
- No new features should be added to the current release branch as for Release Flow - Version 1.
- When the development on the release branch it is finished, the branch should be merged into the master and the develop branch. On the master branch, the commit should be tagged for future references.
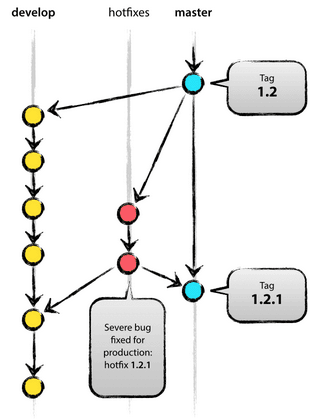
- It could happen that we have had already released and tagged a version on master and we find a bug in the development branch where we are currently working. In this case, the bugfix should be treated as a new release. We will create a new branch for the fix, this time starting from the tag on the master branch, solve the bug and then merge the hotfix branch on the develop branch and on the master with a new tag. See Figure 6 for visual detail.
An example of workflow
Here I will present an example of terminal git commands that you should use in specific situations. It is assumed that the master branch is called master.
Note: All the examples described below are referred to the Release Flow - Version 1. If you have decided for the approach of Release Flow - Version 2 with a develop branch, you could anyway refer to the following examples taking in consideration to work instead of on master branch on the develop branch and you need to remember that when a release branch is released, all the changes should be merge requested on both develop and master branch.
When there is a task to be done
git checkout master: go inside the master branch
A new task named "foo" has to be done.
git checkout -b foo: foo branch created locally, you can work heregit push -u origin foo: push local foo branch to remote
Once finished working on your task on your local foo branch
git pull origin master: this will pull all the changes that in the meanwhile someone else has done on the master branch. Here you have to solve all the conflicts. Only when you have solved all the conflicts, please commit them and go on with a merge request.- Go on GitLab and create your merge request of the foo branch on the master branch.
When there is a release to develop
When a release is planned, someone in the team should create the branch for that release. Assuming that the release is the 2.0.0, there will be a branch named, for example, v2.0.0 (not necessarily the name should be the same as the versioning of the release).
git checkout -b v2.0.0: v2.0.0 branch created locally, you can work heregit push -u origin v2.0.0: push the local v2.0.0 branch to remote
Everyone should work on this branch, so everyone should download and track this branch
git checkout -t origin/v2.0.0: this will download locally the v2.0.0 branch (-t option is to automatically set the origin of this branch)
Every feature, task or everything else from the 2.0.0 backlog should be developed here. If the task is a general task (i.e.: not specifically regarding the v2.0.0 version; please see at the end of this chapter to read a further explanation), it should be even pushed in the master branch. However, as I already said, no new features should be added from now on this branch release. Any new ideas should go in the backlog for a future release. Instead, any bugfix should be pushed as soon as possible on the master branch. No one should work directly on the v2.0.0 branch but every task to be implemented must be developed by one developer on the very own task branch. So, if the new task oof must be implemented, the developer in charge should create the branch and, once finished, ask for a merge request.
git checkout -b oof: oof branch created locally, you can work heregit push -u origin oof: push local oof branch to remote
Once finished to work on the task, update your local branch with an update from the v2.0.0 branch and ask for a merge request
git pull origin oof: update the local oof branch and manually solve the conflicts and then go on GitLab and do a merge request.
Further explanation: I previously stated that "if the task is a general task, it should be even pushed in the master branch". This is because could happen that a specific release could be for a specific hardware version of a machine. Let's say we are developing a software for robots in a factory. The software should be installed for every robot but we have one specific robot X with different hardware from the other ones for which we have a specific release branch v2.0.0-X. Some part of the work we do on this branch could be robot X specific so we should not push that on the master branch.
When there is an urgent hotfix
It could be possible that during the development of a release, someone discovers a bug on the master branch or discover a bug during the development of the release that is not strictly connected with the code changes he is doing. In this case, a hotfix should be applied as soon as possible on the master and on the current release branch.
Assuming that we are working on the version v2.0.0 we should branch the master in order to correct the bug Y:
git checkout -b bugfix-Y: we create this branch from the master branch (alternatively we could create it from the release branch)git push -u origin bugfix-Y: push the local bugfix-Y branch to remote
After the bug it is solved we have to integrate the changes on the release branch. It is possible that in order to correctly do this, you have to cherry-pick the commit and bring it to the release branch. This because in the meanwhile the master branch could have possibly evolved from where it was when we firstly branched the release branch from it.
git checkout -b v2.0.0: return on the branch on which you want to apply the bugfixgit cherry-pick <commit-hash>: apply the bugfix to the current branch. commit-hash should be the hash of the commit where we did the hotfix
Conclusion
I've had the opportunity to work with this workflow many times. Above all, I happened to work with a Release Flow - Version 1 to develop many models of industrial machines for ceramic printers, where for each machine we had many software versions for which we had to guarantee stability and efficiency because of the important performance and reliability requirements of ceramic production lines. In addition, each customer had a different version of the software (someone was used to a specific version, someone has an old machine that could no longer be updated, etc.) and so we had to properly maintain each version. Thanks to the Release Flow we were able to maintain many different software versions and to work with large and heterogeneous teams. The main pros are:
- Every release is perfectly traceable
- The team can work independently on every release
- Team with complete control of the code
- The development of a release is very neat and respectful of all good practice of software (and Agile) development
- Very clean management of the tasks
- No use of monorepo (so, no tightly coupling and more scalability of projects)
- No merge hells