

More and more often developers associate test automation with code quality. Why?
In general, manual testing requires a lot of time, to be spent at every build or commit. Conversely, automated tests can run very fast, eventually at every commit, even on different machines and operating systems. They can save from regressions, and serve as helpful documentation too!
But this is not all! Writing automated tests, especially unit ones, is a very good practice. It forces developers to think about the functions they implement, outlining input and output (including side effects), eventually spotting unhandled exceptions.
Are you tired of finding regressions in features you spent such great effort implementing? Get ready, you are about to find out how to write unit tests in Unreal Engine 4!
Unreal Engine Automation System: test suite
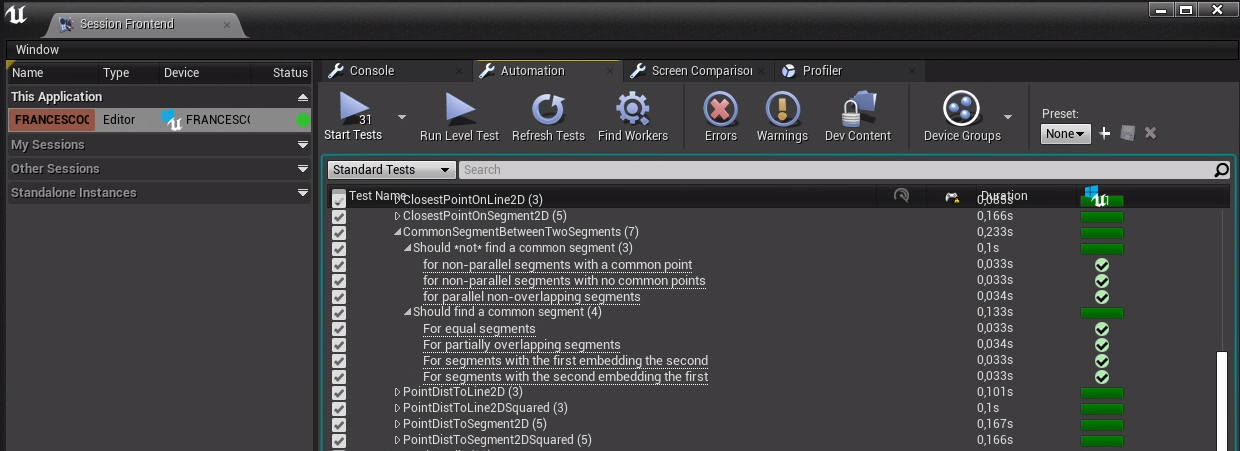
First thing first, let us enable the Unreal Test Suite GUI as explained in the official documentation. Within the test suite, one can find both the Engine tests and the project-specific ones, and run all or a subset of them.
The easiest method to write a test is by means of the IMPLEMENT_SIMPLE_AUTOMATION_TEST macro. It requires a class name, a test name (shown in the GUI), and some flags (in order to filter them by their type).
IMPLEMENT_SIMPLE_AUTOMATION_TEST(FMyAwesomeTest, "Test path.Test name", EAutomationTestFlags::ApplicationContextMask | EAutomationTestFlags::ProductFilter)

bool FMyAwesomeTest::RunTest(FString const& Parameters){
	return true;
}
After calling the macro within the compiled code of the project, one has to provide a definition for the RunTest() method of the just defined class. Indeed, the macro is just a utility to easily declare and instance a class with the provided name. The RunTest() method is the test: it returns a boolean value to indicate its success or failure. Also, any UE_LOG(Error) executed within the test run (including the project and the Engine code) will make the test fail, while any UE_LOG(Warning) will let it pass with warnings.
There also are some assertion methods to be used within these tests. TestTrue/TestFalse, to check booleans, TestEqual/TestNotEqual, for equalities, and so on... The failure of an assertion will log an error, and make the test fail. For instance, the following test
IMPLEMENT_SIMPLE_AUTOMATION_TEST(FMyAwesomeTest, "Test path.Test name", EAutomationTestFlags::ApplicationContextMask | EAutomationTestFlags::ProductFilter)

bool FMyAwesomeTest::RunTest(FString const& Parameters){
	const auto BoolToTest = false;
	TestTrue("bool to test", BoolToTest);

	const auto FloatToTest = 0.F;
	const auto Expected = 10.F;
	const auto Tolerance = KINDA_SMALL_NUMBER;
	TestEqual("float to test", FloatToTest, Expected, Tolerance);

	return true;
}
fails (even if it returns true) because of the assertions, and it prints out something like
Test 'Test path.Test name' completed with result 'Failed'.
Error: Expected 'bool to test' to be true.
Error: Expected 'float to test' to be 10.0000, but it was 0.0000 within tolerance 0.0001
Latent Commands
Tests may sometimes require some deferred actions, which run across multiple frames. In order to implement them without risking a premature test termination, one can use Latent Commands. They are classes, declared by means of the DEFINE_LATENT_AUTOMATION_COMMAND macro, with an Update() function (command pattern) returning a boolean value. When we add a command to a test, which can be done through the ADD_LATENT_AUTOMATION_COMMAND macro, the command is enqueued in a FIFO data structure. After RunTest has been executed the latent commands in the queue will be run. Each command will be called only after the previous one has been executed with success (i.e. returning true). The test will not terminate until the queue is empty.
Parametric tests
What has been said so far is enough to start writing some simple unit-tests! But what if we wanted to repeat a test for multiple values? Should we copy-paste the code multiple times?
Of course not! The macro IMPLEMENT_COMPLEX_AUTOMATION_TEST allows us to write parametric tests! Yet, since it is not that intuitive to use, nor scalable, Epic provided us with the Automation Spec syntax.
Probably inspired by RSpec, the Automation Spec is a very powerful way to write parametric tests. The last part of this post will focus on this syntax, but if you are interested in the complex tests macro, here is the official documentation.
Automation Spec
In order to write an Automation Spec, we are provided with two macros: BEGIN_DEFINE_SPEC and END_DEFINE_SPEC. They work pretty much like the previous ones, apart from the fact that whatever method or variable declared within the two will become a member of the created test class. This helps grouping constants and utility methods, but also makes it possible to share data between different blocks, as we are about to see. In the case of spec, the Define() method must be implemented
BEGIN_DEFINE_SPEC(FClassName, "TestPath", TestFlags)
	int UsefulInteger = 0;
	void UtilityMethodForTest();
END_DEFINE_SPEC(FClassName)

void FClassName::UtilityMethodForTest() {
	// do stg
}

void FClassName::Define() {
	// Define() implementation
}
The test (or tests) must be defined within the Define() function implementation, by calling any overload of the It method of the spec base class, together with a function object (the test itself). The function object may not return a boolean, for the test result will be determined by the asserts and UE_LOG's, just like for the simple tests.
void FClassName::Define() {
	It("Test description", [this](){
		const auto a = true;
		TestTrue("value of a", a);
	});
}
In case no It is called, no test will be generated. Multiple It's are allowed, and it is possible to call them in a loop, for instance:
void FClassName::Define() {
	for (auto i = 0; i<10; i++){
		It("Unique test description, depending on parameter " + FString::FromInt(i), [this, i](){
			TestTrue("i is less than 20", i < 20);
		});
	}
}
generates 10 parametric tests! Note that i has been captured by copy. Indeed, Define() is called when generating the test names (e.g. when opening the Test Suite GUI from the editor), while the lambda of the test is called only when the actual test is run (which is far after i has fallen out of scope!).
It is important to mention that one must not call an It inside the function object passed to another It: it will compile, but crash as soon as we try to run the "parent" test.
Further parameterization steps
What if we wanted to repeat some code for every It? For instance, opening a map, perform some checks, then close it? That is where BeforeEach and AfterEach come into play!
void FClassName::Define() {
	BeforeEach([this](){
		// open a map
		// can also use assertions to verify that the map has been opened
	});

	It("Test1 description", [this, i](){
		// do stg
	});

	It("Test2 description", [this, i](){
		// do stg
	});

	It("Test3 description", [this, i](){
		// do stg
	});

	AfterEach([this](){
		// close the map
		// can also use assertions to verify that the map has been closed
	});
}
In the example, every test (one for each It) will first call the function object in the BeforeEach, then the one in the It, then finally the one in the AfterEach.
We can call more than one BeforeEach/AfterEach and, in order to have more control, we can also define scopes, by means of the Describe method. They will be executed according to the following rules:
BeforeEach/AfterEachonly apply to the current scope (and the nested ones)- Lambdas in the
BeforeEach's will be executed in the provided order - Lambdas in the
AfterEach's will be executed in reverse order if in the same scope, but still follow the nesting order of the scopes
Let us try to understand these rules with a practical example:
void FClassName::Define() {
	BeforeEach([this](){
		UE_LOG(LogTemp, Display, TEXT("b1"));
	});
	Describe("Scope1", [this](){
		BeforeEach([this](){
			UE_LOG(LogTemp, Display, TEXT("b2"));
		});

		It("Test1", [this](){
			UE_LOG(LogTemp, Display, TEXT("t1"));
		});

		Describe("Scope2", [this](){
			BeforeEach([this](){
				UE_LOG(LogTemp, Display, TEXT("b3"));
			});

			It("Test2", [this](){
				UE_LOG(LogTemp, Display, TEXT("t23"));
			});

			It("Test3", [this](){
				UE_LOG(LogTemp, Display, TEXT("t23"));
			});

			AfterEach([this](){
				UE_LOG(LogTemp, Display, TEXT("a1"));
			});
		});

		AfterEach([this](){
			UE_LOG(LogTemp, Display, TEXT("a2"));
		});

		AfterEach([this](){
			UE_LOG(LogTemp, Display, TEXT("a3"));
		});
	});

	AfterEach([this](){
		UE_LOG(LogTemp, Display, TEXT("a4"));
	});
}
In the example above, Scope1.Test1 will print
b1
b2
t1
a3
a2
a4
while Scope1.Scope2.Test2 and Scope1.Scope2.Test3 will both print
b1
b2
b3
t23
a1
a3
a2
a4
Naming our tests
The input strings to the Describe and It methods also constitute part of the name of the test, together with the one provided with the BEGIN_DEFINE_SPEC macro. For instance, a nice naming convention may be something like
BEGIN_DEFINE_SPEC(FTestClass, "ModuleName.Submodule name", TestFlags)
END_DEFINE_SPEC(FTestClass)

void FTestClass::Define(){
	Describe("ComputeCrossProduct(FVector, FVector)", [this](){
		It("Should correctly compute the cross product among the vectors (1,0,0) and (0,1,0)",
		[this](){
			FVector res = ComputeCrossProduct(FVector::ForwardVector, FVector::RightVector);
			TestEqual("cross product between the given vectors", res, FVector::UpVector);
		});
	});
}
Which is going to produce a test with path:
ModuleName
< Submodule name
<< ComputeCrossProduct(FVector, FVector)
<<< Should correctly compute the cross product among the vectors (1,0,0) and (0,1,0)
(note that dots generate a subpath). This way, one can really give a structure to the automated tests, and make them easy to be found and executed.
Latent commands in Automation Spec
I am sometimes asked if Latent Commands can be used in Specs. Indeed, developers trying to use them are often confused by their behavior in this scenario. Let me try to explain what is going on.
By looking at the FAutomationSpecBase implementation, one finds out that an automation spec is like a classic simple automation test, in which the BeforeEach, It and AfterEach are enqueued as latent commands.
Hence, when we add a latent command within a test run, we are inserting it into the queue, and it will be executed after the last of the AfterEach's! So, yes, we can use latent commands, but we need to know what we are doing!
Take note that there also exist the LatentBeforeEach/LatentIt/LatentAfterEach Latent Commands. These commands work as BeforeEach/It/AfterEach, but they require an FDoneDelegate to be passed. The test execution will not go on with the following latent command until the Execute is called. For instance:
void FClassName::Define() {
	LatentBeforeEach([this](FDoneDelegate const& done){
		OnEventComplete().Add([&done](){ done.ExecuteIfBound(); })
		f(); // some function which eventually triggers the OnEventComplete()
	});

	It("Test1 description", [this](){
		// do stg
	});

	AfterEach([this](){
		// do stg
	});
}
In this example, the test is not going to execute the callable in the It until OnEventComplete() is called.
Conclusions
Here it is, you are now able to write unit tests in Unreal Engine 4! By combining all the above-mentioned functionalities, you can implement lots of parametric tests, each one with its highly-descriptive name.
Tests can also be run within the CI/CD, to make sure they are executed at every commit! In Zuru, we also have a stage for test names generation: a script analyzes the command-line log and prints out a list of tests in a fancy formatted .csv file. This helps our QA-testers find out whether a feature is covered by test automation!
Please let me know if any of this is unclear. or incorrect. Any feedback is greatly appreciated! Some other posts may follow, explaining how to write functional tests, how to open a map, and how to simulate user input... Stay tuned, we are just getting started!